Setting up a minecraft server windows vps is one of the most flexible ways to host your own multiplayer world in 2025, giving you full control over performance, mods, and player capacity. Whether you’re running a vanilla survival realm or a heavily modded community hub, a Windows VPS offers the familiarity of a Windows environment with dedicated resources powered by modern hardware.
Why Choose a Windows VPS for Your Minecraft Server?
A minecraft server windows vps combines the ease of Windows Server management with the power of dedicated virtualization technology. Unlike shared hosting, a VPS ensures your Minecraft world runs on isolated resources—CPU, RAM, and storage—guaranteeing consistent performance even during peak hours.
Windows VPS solutions are particularly attractive for administrators who prefer GUI-based server management or need compatibility with Windows-only tools and applications. The KVM virtualization standard ensures true resource dedication, meaning your allocated 8 GB of DDR5 ECC RAM or your slice of the AMD Ryzen 9 7950X3D processor won’t be borrowed by neighboring tenants.
Key Advantages of Windows VPS for Minecraft
- Familiar interface: Remote Desktop (RDP) access provides a full Windows desktop experience for easy file management, configuration editing, and troubleshooting.
- Dedicated resources: KVM virtualization guarantees your vCPU threads and RAM allocation remain yours alone, eliminating “noisy neighbor” issues common in OpenVZ containers.
- Mod and plugin flexibility: Install Forge, Fabric, Paper, or Spigot directly; upload custom JAR files; manage backups via GUI tools like WinSCP or directly through File Explorer.
- Scalability: Easily upgrade RAM (32 GB, 64 GB, or 128 GB DDR5 ECC) and storage (NVMe SSD) as your player base grows.
- Game-grade Anti-DDoS: Professional hosting providers include DDoS mitigation tuned for gaming traffic, keeping your server online during attacks.
At Nexus Games, every Windows VPS is powered by the AMD Ryzen 9 7950X3D (16 cores, 32 threads, up to 5.7 GHz boost), DDR5 ECC memory, and NVMe SSD storage with 1 Gbps network connectivity—ideal specs for hosting Minecraft servers that demand both single-threaded performance and multi-core stability.
Step-by-Step: How to Create a Minecraft Server on Windows VPS
Creating your minecraft server windows vps involves provisioning the VPS, installing Java, downloading the server software, and configuring firewall rules. Follow this comprehensive guide to get your server online in under 30 minutes.
Step 1: Provision Your Windows VPS
Select a Windows VPS plan that matches your expected player count and mod complexity. For a vanilla server supporting 10–20 players, 8 GB RAM and 2–4 vCPU cores suffice. Modded servers (100+ mods) or large communities (50+ players) benefit from 16–32 GB RAM and 6–8 cores.
Once provisioned, you’ll receive RDP credentials (IP address, username, password). Use the built-in Remote Desktop Connection tool (Windows) or Microsoft Remote Desktop (macOS/Linux) to connect to your VPS.
Step 2: Install Java Development Kit (JDK)
Minecraft 1.20+ requires Java 17 or newer. Download the latest OpenJDK or Oracle JDK from Adoptium or Oracle.
1. Download the Windows x64 MSI installer
2. Run the installer and select "Add to PATH" during setup
3. Open Command Prompt and verify installation:
   java -version
4. Confirm output shows Java 17+ (e.g., "openjdk version 17.0.9")
Step 3: Download Minecraft Server Software
Create a dedicated folder (e.g., C:\MinecraftServer) and download your chosen server JAR:
- Vanilla: Official Minecraft Server (server.jar)
- Paper (optimized): PaperMC (paper-1.20.4.jar)
- Forge (mods): Forge Installer (forge-installer.jar)
- Fabric (lightweight mods): Fabric Installer (fabric-installer.jar)
Place the JAR file in C:\MinecraftServer. If using Forge or Fabric, run the installer JAR first, select “Install Server,” and point it to this directory.
Step 4: Configure Server Properties
Launch the server once to generate configuration files:
cd C:\MinecraftServer
java -Xmx6G -Xms6G -jar server.jar nogui
The server will stop after generating eula.txt. Open this file in Notepad and change eula=false to eula=true.
Edit server.properties to customize your world:
server-port=25565
max-players=50
difficulty=hard
gamemode=survival
pvp=true
spawn-protection=16
view-distance=10
simulation-distance=8
motd=Welcome to My Windows VPS Server!
Adjust view-distance and simulation-distance based on available RAM. Higher values (12–16) demand more memory but improve player experience.
Step 5: Allocate RAM and Launch the Server
The -Xmx and -Xms flags control maximum and minimum RAM allocation. For an 8 GB VPS, allocate 6 GB to Minecraft (leaving 2 GB for Windows):
java -Xmx6G -Xms6G -jar server.jar noguiFor 16 GB VPS, use -Xmx12G -Xms12G. For 32 GB, -Xmx28G -Xms28G. Monitor Task Manager (Ctrl+Shift+Esc) to ensure you’re not over-allocating.
Create a start.bat file for easy restarts:
@echo off
java -Xmx6G -Xms6G -jar server.jar nogui
pause
Double-click start.bat to launch your server. The console will display “Done!” when ready.
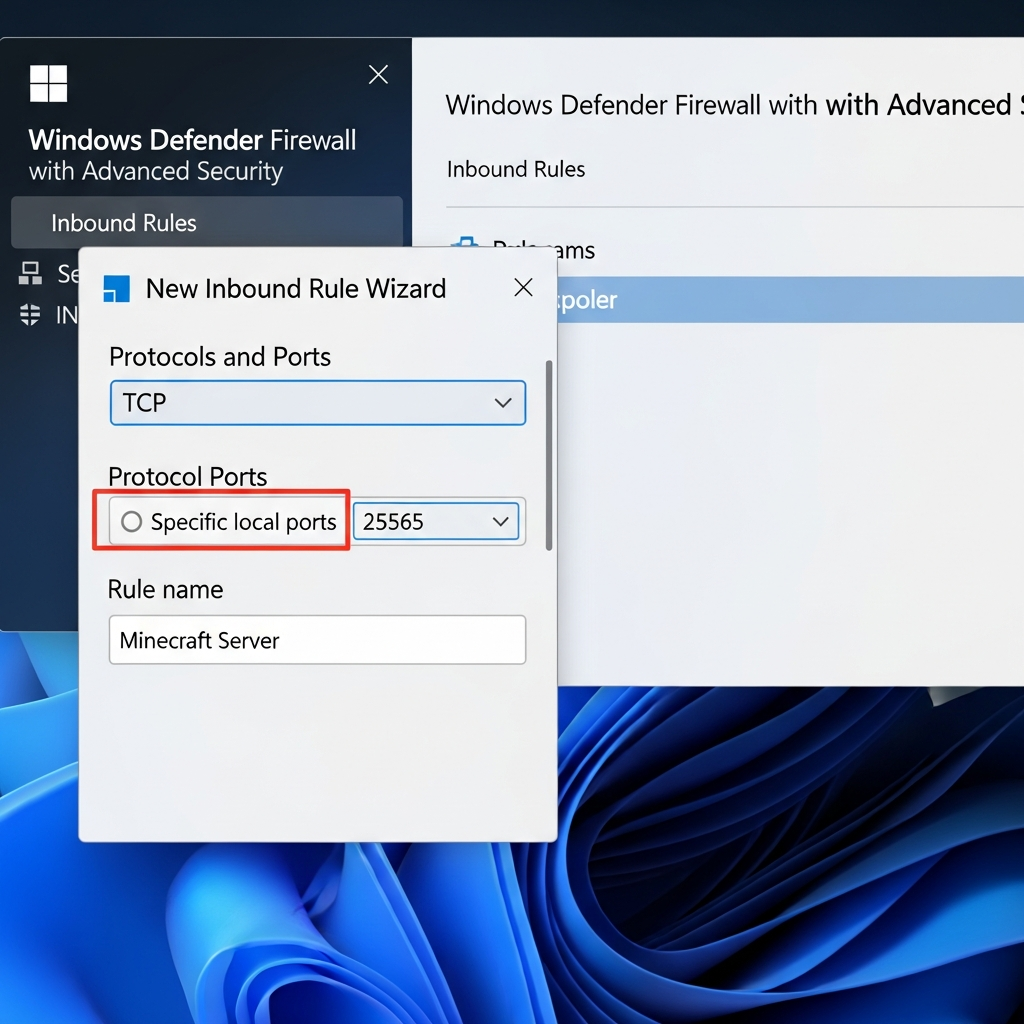
Step 6: Configure Windows Firewall
By default, Windows Firewall blocks inbound connections on port 25565. Create an inbound rule:
1. Open Windows Defender Firewall with Advanced Security
2. Click "Inbound Rules" → "New Rule"
3. Select "Port" → "TCP" → Specific local ports: 25565
4. Allow the connection → Apply to Domain, Private, Public
5. Name: "Minecraft Server"
If using a custom port (e.g., 25566), update both server.properties (server-port=25566) and the firewall rule.
Step 7: Connect and Test
From the Minecraft client, add a new server using your VPS public IP (e.g., 203.0.113.45). If you’ve configured a custom port, append it with a colon (203.0.113.45:25566).
Your server should appear online with a green connection indicator. Join and verify world generation, chat, and player movement. Check the server console for any errors (red text).
Optimizing Performance and Security for Your Minecraft Server Windows VPS
Once your minecraft server windows vps is running, optimize performance and harden security to ensure a smooth, safe experience for your community.
Performance Tuning
JVM Flags for Garbage Collection
Modern JVM flags reduce lag spikes caused by garbage collection. Replace your launch command with Aikar’s optimized flags (proven for Minecraft):
java -Xmx6G -Xms6G -XX:+UseG1GC -XX:+ParallelRefProcEnabled -XX:MaxGCPauseMillis=200 -XX:+UnlockExperimentalVMOptions -XX:+DisableExplicitGC -XX:+AlwaysPreTouch -XX:G1NewSizePercent=30 -XX:G1MaxNewSizePercent=40 -XX:G1HeapRegionSize=8M -XX:G1ReservePercent=20 -XX:G1HeapWastePercent=5 -XX:G1MixedGCCountTarget=4 -XX:InitiatingHeapOccupancyPercent=15 -XX:G1MixedGCLiveThresholdPercent=90 -XX:G1RSetUpdatingPauseTimePercent=5 -XX:SurvivorRatio=32 -XX:+PerfDisableSharedMem -XX:MaxTenuringThreshold=1 -Dusing.aikars.flags=https://mcflags.emc.gs -Daikars.new.flags=true -jar server.jar noguiThese flags are particularly effective on the AMD Ryzen 9 7950X3D’s 3D V-Cache architecture, leveraging large L3 cache for reduced memory latency.
Server Software Choice
| Software | Best For | Performance | Plugin Support |
| Vanilla | Pure survival, no plugins | Baseline | None |
| Paper | Optimized vanilla+plugins | +40% TPS vs Vanilla | Bukkit/Spigot plugins |
| Forge | Heavy mods (100+) | -20% (mod overhead) | Forge mods only |
| Fabric | Lightweight mods | +10% vs Vanilla | Fabric mods only |
For modded servers, pre-install modpacks via CurseForge. If hosting through Nexus Games’ Minecraft hosting, one-click CurseForge integration is available directly in the control panel, eliminating manual ZIP uploads.
View Distance and Simulation Distance
Reduce view-distance from 10 to 8 chunks for a 15% RAM savings. Lower simulation-distance (controls mob/crop ticking) to 6 for another 10% CPU reduction without noticeable gameplay impact.
Security Best Practices
Whitelist and Operator Permissions
Enable whitelist mode in server.properties:
white-list=trueAdd trusted players via console:
whitelist add PlayerName
op PlayerName
Limit operator permissions to prevent abuse. Edit ops.json and set "level": 2 (gamemode, time, weather) instead of 4 (full server control).
Regular Backups
Schedule daily backups using Windows Task Scheduler. Create a PowerShell script (backup.ps1):
$source = "C:\MinecraftServer\world"
$destination = "C:\Backups\world_$(Get-Date -Format 'yyyyMMdd_HHmmss').zip"
Compress-Archive -Path $source -DestinationPath $destination
Run via Task Scheduler at 3 AM daily (low-traffic hours). Retain 7 days of backups, delete older archives automatically.
Anti-DDoS and Network Protection
Minecraft servers are frequent DDoS targets. Enterprise-grade hosting providers include game-specific anti-DDoS (analyzing Minecraft protocol traffic to distinguish legitimate players from attack packets). Nexus Games’ infrastructure includes 1 Gbps uplink with multi-layered DDoS mitigation, filtering malicious traffic before it reaches your VPS.
Remote Management and Monitoring
Install RCON (Remote Console) tools for command-line management without RDP:
# In server.properties:
enable-rcon=true
rcon.password=StrongPassword123
rcon.port=25575
Use mcrcon (Windows binary available) to execute commands remotely:
mcrcon -H 203.0.113.45 -P 25575 -p StrongPassword123 "list"For 24/7 operation, configure the server as a Windows Service using NSSM (Non-Sucking Service Manager):
nssm install MinecraftServer "C:\Program Files\Java\jdk-17\bin\java.exe" "-Xmx6G -Xms6G -jar C:\MinecraftServer\server.jar nogui"
nssm set MinecraftServer AppDirectory "C:\MinecraftServer"
nssm start MinecraftServer
The server will auto-restart on VPS reboot.
Troubleshooting Common Issues
Server Won’t Start: “Unable to Access Jarfile”
Ensure the JAR filename in your launch command matches the actual file. Windows is case-insensitive but command-line typos cause errors:
java -jar server.jar  # ✓ Correct if file is "server.jar"
java -jar Server.jar  # ✗ Fails if file is lowercase
Players Can’t Connect: “Connection Timed Out”
Verify three things:
- Firewall rule: TCP port 25565 allowed inbound (see Step 6).
- VPS provider firewall: Some providers require additional network security group rules in their control panel.
- Server running: Check the console for “Done! For help, type ‘help'” message.
Test connectivity with telnet from an external machine:
telnet 203.0.113.45 25565If connection succeeds, the issue is client-side (incorrect IP/port). If it fails, recheck firewall and VPS network settings.
Low TPS (Ticks Per Second) and Lag
Monitor TPS via plugins like Spark (Paper/Spigot) or the /debug start command. TPS below 18 causes noticeable lag (target: 20 TPS).
Common culprits:
- Entity overload: Too many mobs (use
/kill @e[type=!player]to clear). - Chunk loading: Reduce
view-distanceandsimulation-distance. - RAM allocation: Increase
-Xmxflag if RAM usage exceeds 90% (check Task Manager). - Mod conflicts: Test server with mods disabled one-by-one to identify performance hogs.
Out of Memory Errors
If the console shows java.lang.OutOfMemoryError: Java heap space, increase RAM allocation or upgrade your VPS plan. For modded servers, 8 GB is minimum; 16–32 GB is recommended.
Nexus Games offers seamless VPS upgrades via the control panel—add 8 GB RAM or 2 vCPU cores in under 5 minutes without data migration.
With these steps, your minecraft server windows vps is production-ready: optimized for performance, hardened against threats, and configured for reliable 24/7 operation. Whether you’re hosting a private realm for friends or a public community hub with 100+ players, a Windows VPS on modern hardware like the AMD Ryzen 9 7950X3D delivers the horsepower and flexibility to bring your Minecraft vision to life.
FAQ
How much RAM do I need for a Minecraft server on Windows VPS?
For vanilla Minecraft with 10–20 players, allocate 6 GB RAM (8 GB VPS plan). Modded servers with 50–100 mods require 12–16 GB, while large modpacks (200+ mods) or 50+ concurrent players demand 24–32 GB. Always leave 2 GB for Windows OS overhead. Nexus Games VPS plans offer DDR5 ECC RAM in 8 GB increments, scalable up to 128 GB.
Can I run multiple Minecraft servers on one Windows VPS?
Yes, by configuring each server on a unique port (e.g., 25565, 25566, 25567) in server.properties. Create separate folders (C:\Server1, C:\Server2) and launch each with dedicated RAM allocation. A 16 GB VPS can comfortably host two 6 GB servers, or four 3 GB lightweight servers. Ensure firewall rules allow all ports used.
What are the performance differences between Windows VPS and Linux VPS for Minecraft?
Linux VPS typically offers 5–10% better raw performance due to lower OS overhead, but Windows VPS provides GUI-based management, RDP access, and compatibility with Windows-only tools. For administrators comfortable with SSH and command-line tools, Linux is ideal. For those preferring Remote Desktop and graphical file management, Windows VPS offers equivalent game performance (especially with KVM virtualization and modern CPUs like Ryzen 9 7950X3D) with significantly easier administration.