Learning how to install plugins on a Minecraft server is essential for anyone looking to customize and enhance their multiplayer experience in 2025. Plugins unlock endless possibilities—from economy systems and custom mini-games to advanced protection and player management tools. This comprehensive guide walks you through every step of the plugin installation process, from choosing the right server software to troubleshooting common issues, ensuring your Minecraft server runs smoothly on powerful infrastructure like the AMD Ryzen 9 7950X3D with DDR5 ECC RAM.
Understanding Minecraft Server Types and Plugin Compatibility
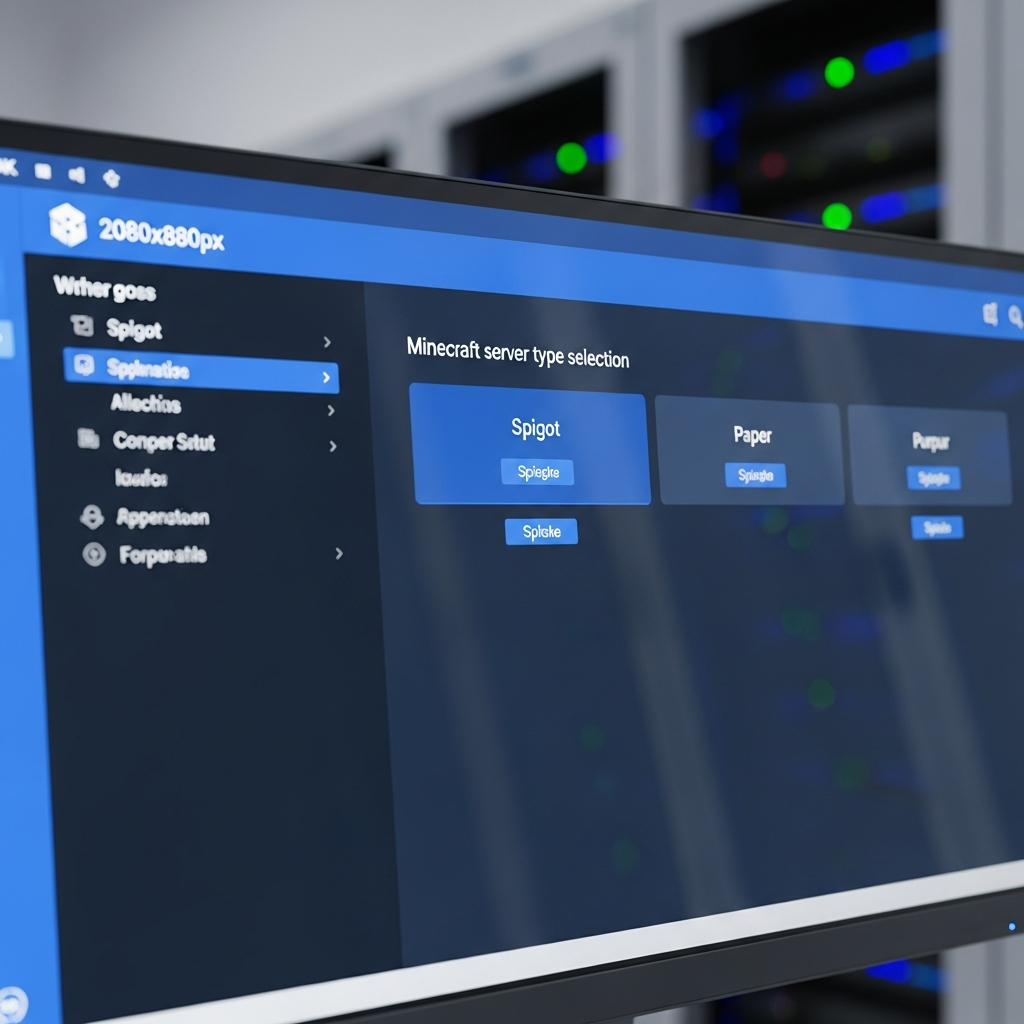
Before you can install plugins on your Minecraft server, you must understand that not all server software supports plugins. Vanilla Minecraft servers—the official software from Mojang—do not support plugins at all. To use plugins, you need specialized server software built on the Bukkit API or its derivatives.
Server Software That Supports Plugins
The most popular plugin-compatible server platforms in 2025 include:
- Spigot: A high-performance fork of CraftBukkit, optimized for speed and stability. Spigot is the most widely used plugin server software and receives regular updates.
- Paper: Built on top of Spigot, Paper offers even better performance optimizations and fixes many vanilla bugs. It maintains full compatibility with Spigot and Bukkit plugins.
- Purpur: An extension of Paper that adds more configuration options and features while maintaining plugin compatibility.
- CraftBukkit: The original plugin server software, though now largely superseded by Spigot and Paper.
When hosting with Nexus Games Minecraft servers, you can easily switch between these server types through the control panel, all running on high-performance AMD Ryzen 9 7950X3D processors (16 cores / 32 threads at up to 5.7 GHz) with DDR5 ECC RAM for maximum stability and speed.
Mods vs. Plugins: Understanding the Difference
It’s crucial to distinguish between mods and plugins. Mods (using Forge, Fabric, or Quilt) modify the game itself and require clients to install matching files. Plugins run entirely server-side and work with vanilla Minecraft clients. This guide focuses exclusively on plugins, which are simpler to deploy and don’t require players to download anything extra.
Step-by-Step Guide: How to Install Plugins on Your Minecraft Server
Now that you understand server compatibility, let’s walk through the complete process to install plugins on a Minecraft server. This method works for Spigot, Paper, Purpur, and other Bukkit-based servers.
Step 1: Choose and Download Your Plugins
The first step is selecting reliable plugins from trusted sources. The two most reputable plugin repositories are:
- SpigotMC Resources: The official Spigot plugin repository with thousands of verified plugins
- Bukkit/CurseForge: Another established platform with extensive plugin libraries
Popular essential plugins for 2025 include:
| Plugin Name | Function | Why Install It |
| EssentialsX | Core server commands | Adds /home, /warp, /tpa, economy, and 100+ essential commands |
| WorldEdit | World editing | Allows massive terrain modifications and building assistance |
| LuckPerms | Permission management | Advanced permission system with group inheritance and prefixes |
| Vault | Economy API | Required dependency for many economy-based plugins |
| CoreProtect | Logging & rollback | Tracks all block changes and allows restoration after griefing |
When downloading, always verify you’re getting the .jar file compatible with your Minecraft version. Check the plugin’s compatibility notes carefully—using incompatible plugins can crash your server.
Step 2: Access Your Server Files
To install plugins, you need access to your server’s file system. With Nexus Games hosting, you have multiple convenient options:
- Built-in File Manager: Access files directly through the Nexus Games panel with a user-friendly interface
- FTP/SFTP: Use FileZilla or WinSCP to connect using credentials from your control panel
- Direct Panel Upload: Drag-and-drop plugin files directly through the web interface
The infrastructure supporting these access methods runs on NVMe SSD storage for lightning-fast file operations, ensuring plugin uploads and server restarts happen in seconds rather than minutes.
Step 3: Upload Plugins to the Plugins Folder
Once connected to your server files, navigate to the root directory. You’ll see several folders including plugins, world, logs, and others. The installation process is straightforward:
- Open the
pluginsfolder (if it doesn’t exist, start your server once to generate it) - Upload your downloaded .jar files directly into this folder
- Do not extract or unzip the .jar files—they must remain as .jar archives
- Ensure file permissions are correct (typically 644 for files, 755 for directories)
Example of a properly organized plugins folder structure:
plugins/
├── EssentialsX-2.20.1.jar
├── Vault-1.7.3.jar
├── LuckPerms-Bukkit-5.4.102.jar
├── WorldEdit-bukkit-7.2.15.jar
└── CoreProtect-22.2.jar
Step 4: Restart Your Server
After uploading plugins, you must restart the server for them to load. Through the Nexus Games control panel, simply click the restart button. The server will shut down gracefully, load the new plugins, and restart—typically completing in under 30 seconds thanks to the high-performance AMD Ryzen 9 7950X3D processor.
During the restart, the server will:
- Detect new .jar files in the plugins folder
- Load each plugin and execute initialization code
- Generate configuration folders for each plugin inside the
plugins/directory - Register plugin commands and event listeners
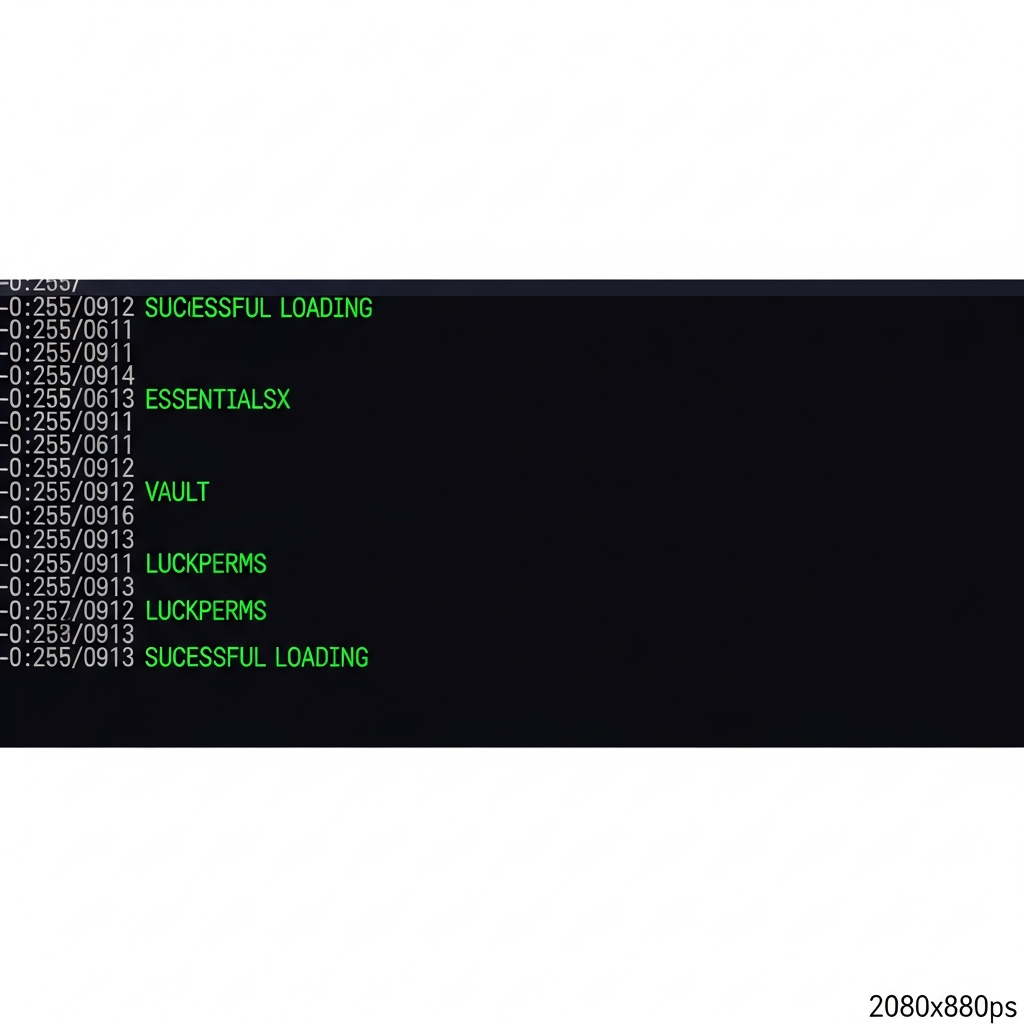
Step 5: Verify Plugin Installation
Once your server is back online, connect to it and verify plugins loaded correctly. Type the following command in-game or in the server console:
/pluginsor
/plProperly loaded plugins will appear in green. If a plugin appears in red, it failed to load—usually due to version incompatibility, missing dependencies, or corrupted files. Check your server console logs for detailed error messages that will guide troubleshooting.
Configuring and Managing Your Installed Plugins
Successfully installing plugins is just the beginning. Proper configuration ensures they work together harmoniously and serve your community’s specific needs.
Understanding Plugin Configuration Files
After the first load, each plugin creates its own folder inside plugins/ containing configuration files—typically named config.yml. These YAML files control every aspect of plugin behavior:
plugins/
├── EssentialsX/
│   ├── config.yml
│   ├── kits.yml
│   └── worth.yml
├── LuckPerms/
│   ├── config.yml
│   └── storage/
└── Vault/
    └── config.yml
When editing YAML files, follow these critical rules:
- Use spaces, never tabs for indentation (most errors come from tab characters)
- Maintain consistent indentation levels (usually 2 or 4 spaces)
- Always create backups before making changes
- Use online YAML validators to check syntax before uploading
Essential Plugin Configurations
Let’s examine key configuration examples for commonly installed plugins:
EssentialsX Economy Setup
In plugins/EssentialsX/config.yml, configure starting money and economy settings:
economy:
  starting-balance: 1000
  currency-symbol: '$'
  max-money: 1000000000
LuckPerms Permission Groups
Set up permission groups using in-game commands or the web editor:
/lp creategroup moderator
/lp group moderator permission set essentials.kick true
/lp group moderator permission set essentials.ban true
/lp user PlayerName parent add moderator
Plugin Dependencies and Load Order
Some plugins depend on others to function. Vault is the most common dependency—it provides APIs that economy and permission plugins use. Always install dependencies first:
- Install Vault
- Install your economy plugin (like EssentialsX)
- Install plugins that use economy features (shop plugins, etc.)
- Restart to ensure proper initialization order
The Nexus Games Minecraft hosting environment, powered by DDR5 ECC RAM (32–128 GB depending on your plan), ensures even heavily modded servers with dozens of plugins run smoothly without memory issues or lag spikes.
Using Plugin Managers
Advanced server administrators can use plugin management tools like PlugMan to load, unload, and reload plugins without full server restarts:
/plugman load PluginName
/plugman unload PluginName
/plugman reload PluginName
This is invaluable during configuration testing, though full restarts are still recommended for production changes to ensure complete initialization.
Troubleshooting Common Plugin Installation Issues
Even experienced administrators encounter plugin issues. Here’s how to diagnose and resolve the most common problems when you install plugins on a Minecraft server.
Plugin Shows Red in /plugins List
When a plugin appears red, check these common causes:
- Version mismatch: The plugin was built for a different Minecraft version. Download the correct version from the plugin’s resource page.
- Missing dependencies: Check the plugin description for required dependencies (commonly Vault, ProtocolLib, or PlaceholderAPI).
- Corrupted download: Re-download the .jar file—partial downloads can cause loading failures.
- Server software incompatibility: Some plugins only work on specific platforms (Spigot-only plugins may not work on Paper without updates).
Reading Server Logs for Error Diagnosis
Server logs contain detailed error information. Access logs through your Nexus Games panel or check the logs/latest.log file. Look for stack traces that include the plugin name:
[ERROR] Error occurred while enabling PluginName v1.0 (Is it up to date?)
java.lang.NoClassDefFoundError: org/bukkit/craftbukkit/libs/...
Common error patterns:
| Error Message | Cause | Solution |
| NoClassDefFoundError | Missing dependency or version mismatch | Install required dependencies, verify versions |
| UnsupportedClassVersionError | Java version incompatibility | Update server Java version (Java 17+ for 1.18+) |
| YAMLException | Configuration file syntax error | Check config.yml indentation and syntax |
| Plugin already initialized | Duplicate plugin files | Remove old versions from plugins folder |
Plugin Conflicts and Compatibility
Sometimes plugins conflict with each other, especially when they modify similar game mechanics. If you experience crashes after installing multiple plugins:
- Remove all recently added plugins
- Add them back one at a time, restarting after each
- Identify which combination causes the conflict
- Check both plugins’ documentation for known incompatibilities
- Look for alternative plugins that serve the same purpose
The robust infrastructure at Nexus Games—including game-specific Anti-DDoS protection and 1 Gbps network connectivity—ensures that server performance issues stem from plugin problems rather than hosting limitations, making troubleshooting more straightforward.
Performance Optimization
Too many plugins or poorly coded plugins can impact server performance. Monitor your server’s TPS (ticks per second) using:
/tpsHealthy servers maintain 20 TPS. If TPS drops below 18, investigate using profiling tools like Spark:
/spark profiler start
(wait 2-3 minutes during normal gameplay)
/spark profiler stop
Spark generates detailed reports showing which plugins consume the most CPU time, allowing you to identify and optimize or replace problematic plugins.
Advanced Plugin Installation Methods and Best Practices
For experienced administrators managing multiple servers or complex plugin ecosystems, advanced techniques can streamline the plugin installation and management process.
Automated Plugin Updates
Keeping plugins updated is critical for security and compatibility. While manual updates work, consider automation tools:
- UpdateChecker plugins: Tools like PluginUpdater notify you of available updates
- Scheduled maintenance windows: Set regular times to check and update plugins
- Testing servers: Always test plugin updates on a separate test server before deploying to production
Using Pre-Configured Plugin Packs
For specific server types (survival, mini-games, roleplay), consider pre-configured plugin bundles. The Nexus Games panel offers one-click installation for popular modpacks and plugin collections through CurseForge integration, dramatically reducing setup time while ensuring compatibility.
Security Considerations
Plugin security is paramount. Follow these best practices:
- Only download plugins from trusted sources (SpigotMC, Bukkit/CurseForge, official GitHub repositories)
- Verify plugin authors and check community reviews before installation
- Review plugin permissions in LuckPerms—restrict admin commands to trusted players only
- Keep plugins updated to patch security vulnerabilities
- Use CoreProtect or similar logging plugins to track all player and admin actions
The Nexus Games infrastructure adds an additional security layer with its dedicated Anti-DDoS protection specifically tuned for game servers, ensuring your Minecraft server remains online even during attack attempts.
Backup Strategies for Plugin Configurations
Before major plugin changes, always create backups:
- Use the Nexus Games automated backup system (configurable schedules available)
- Manually download the entire
plugins/folder via FTP - Export critical configurations (LuckPerms data, economy balances) using built-in export commands
- Store backups off-server in cloud storage for disaster recovery
With NVMe SSD storage, backup operations complete rapidly without impacting server performance during gameplay.
Multi-Server Plugin Synchronization
Running a network of connected servers? Synchronize plugin data across them:
- Use MySQL/MariaDB databases for shared LuckPerms permissions across Bungeecord networks
- Configure EssentialsX with MySQL for unified economy and player data
- Deploy Redis for real-time cross-server communication
These advanced setups benefit enormously from Nexus Games’ VPS offerings, which provide dedicated KVM virtualization with full root access, allowing complete database and networking customization alongside your game servers.
For authoritative documentation on Bukkit API and plugin development standards, refer to the official Spigot API documentation.
Conclusion: Mastering how to install plugins on a Minecraft server opens unlimited customization possibilities for your community. By understanding server software compatibility, following systematic installation procedures, properly configuring plugins, and implementing robust troubleshooting practices, you’ll create engaging, stable, and secure multiplayer experiences. With powerful hosting infrastructure like AMD Ryzen 9 7950X3D processors and DDR5 ECC RAM supporting your server, you can confidently run extensive plugin ecosystems that deliver exceptional gameplay without performance compromises.
FAQ
Do I need to restart my Minecraft server every time I install a new plugin?
Yes, in most cases a full server restart is required after adding new plugins to the plugins folder. This ensures proper initialization, dependency loading, and command registration. Advanced tools like PlugMan can hot-load some plugins, but full restarts remain the recommended practice for production servers to avoid initialization conflicts or incomplete plugin loading.
Can I use Forge mods and Bukkit plugins together on the same server?
Not directly. Standard Bukkit/Spigot/Paper servers only support plugins, while Forge servers only support mods. However, hybrid server software like Mohist, Magma, or Arclight attempts to bridge this gap by supporting both simultaneously. These hybrid solutions can be unstable and may have compatibility issues, so they’re recommended only for experienced administrators willing to troubleshoot complex conflicts.
Why does my plugin show as green in /plugins but its commands don’t work?
This typically indicates permission issues rather than installation problems. The plugin loaded successfully, but players lack the necessary permissions to execute its commands. Check your permission manager (LuckPerms, GroupManager, etc.) and grant appropriate permissions. Also verify there are no command conflicts—another plugin might be overriding the same command alias. Use /version PluginName to confirm the plugin is fully active and check its configuration for command prefix settings.